My quilting thoughts and inspirations sprinkled with a glimpse of life down on the farm

Friday, January 31, 2014

EQ Blog Hop - Red & White Quilts


Hopefully you will have seen this Blog Hop this week. It is the kickoff for a year of Red and White Quilt Challenges SewCalGal is running this year.
The idea of this week's blog hop is to show how much fun it is to use EQ software!!
Even if you don't have the software, take a look at the links, you never know what you will learn. The year of challenges is for anyone, you don't have to have EQ software, if you have an interest in Red and White quilts (or even in quilts full stop) you may find something that tempts you. (There is even a challenge for R&W quilts that are already made!)

When it was suggested I take part in this Blog hop I was pretty concerned - I've seen other clever people do fabulous tutorials and make fabulous quilts using their Electric Quilt software, and while I am a keen user, I'm very much an amateur and a wannabee really.
However, we all know the best way to learn is to play. So what if I just played and saw what happened??! Maybe it would encourage others who are in the same boat to do just the same. A whole lot of playing sounded fun to me!!
(If you don't have the software, just scroll through and see the pretty pictures!)
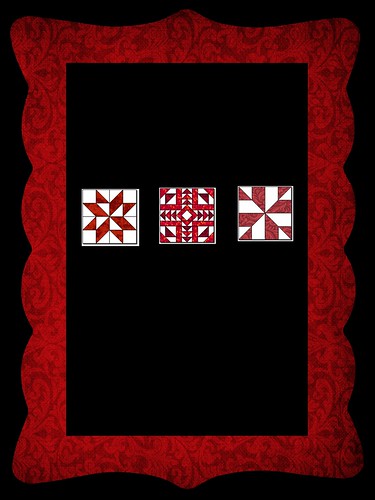
I decided to take one block and see what I could do with it.
Bear's Paw
A word that I love is 'Serendipity'. It sounds good and opens up a world of possibilities.
So my post today is based around the Serendipity function of EQ7. It is not a function I had really looked at before and I have had a blast.
Choose a block you want to play with and click on the following in your EQ7 software.
Work on Block > Block> Serendipity
The first option is 'frame' - lots of possibilities —
Serendipity>Frame
Serendipity>Frame
Serendipity>Frame
 The second option is Tilt —
Serendipity>Tilt
Select the angle you want it tilited at.
It seems to be in increments of .25'
The third option is Merge. For this you need to import another block to merge with your first block.
Not all blocks can be merged, but a bit of playing finds plenty to choose from :-)

Serendipity>Merge
The block above merged with one of my
'framed' Bears Paw.
The fourth option gets even more tricky. Essentially EQ7 takes your block, chops it up and reorganises it!
Clip and Flip.
Serendipity>Clipand Flip
Serendipity>Clip and Flip
Using one of the 'framed' blocks.
Fifth option - Shrink and Flip - more tricky business going on!
Serendipity>Shrink and Flip
Again, using one of the 'framed' blocks.
 Sixth option - Kaleidoscope
Serendipity>Kaleidoscope
There are different options for this,
based on the different quarters that EQ7
splits your block up into.
Seventh Option - Fancy Star
Serendipity>FancyStar
Original Bears Paw block used.
Whew! You can see that just from one block I have created many new ones!! The options appear endless!! Of course not all of them are pretty and not all of them are practical (but what a challenge to sew some of them!!). If I'd known about this button for my Stars class last year I would have saved myself a lot of redrawing!!!
Of course you can open up each new block you have created and edit it, resize, draw in bits (or take bits away), recolour and so on.

So the next phase of my playing was to see how the blocks would work in quilts.
I chose a simple layout with a simple border and just plonked the blocks on it.
Here are some quilt possibilities —
Simple with the original Bears Paw, centre block colours
swapped over.
Using one of the framed blocks
Framed and flipped
Shrink and flip
Combining the kaleidoscope with shrink and flip
(This photo enlarged as the colours went silly on the smaller size.)

A shrunken one in the middle
As you can see, I had a lot of fun while PLAYING! Now to think a little more and work out which - if any - I want to sew up. Some will have funny measurements which will make piecing difficult, some will be better suited to foundation piecing rather than straight piecing and some will go into the delete bucket.
However some are worth a second look and I could end up with something truly unique! 
It doesn't take a lot of time to play but it can be very rewarding - so, if you are like me and have some underused EQ software - PLAY!!!

The other participants in the Bloghop are —

KISSed Quilts with Marlene
Beaquilter with Bea

I haven't visited them yet as I wanted to write my post without influence (or feelings of inadequacy!!)...I look forward to their wise words - the glimpses I've seen when I did the linkups looked very impressive!!

Don't forget to visit SewCalGal too, for more information on this year's Red and White Challenges as well as more EQ7 tips and techniques. 

Happy playing everyone, thankyou for visiting
Have a great day,

Tuesday, January 28, 2014

Monkeys, Birds and a Hop!

There's been a bit of top secret activity in The Palace lately...
We were being invaded by critters but now that they have been re-homed I can share about them :-)

They started off looking very odd — take Dad's old socks, sew and stuff —
Is there hope?
Add a muzzle made from one of his favourite woolen jacket's/zip up cardigan — 
Printing got a little difficult ....
Next came dressing, using Dad's old shirts, lined with fruity fabric leftover from the quilt I made him.
Dressed and ready for a photo shoot
You cant quite see but they are also wearing lapel badges, little souvenirs Dad collected in his travels. One even needed mending - you can see the patch on his head!
Some fought a little when it was time to be bagged.
This guy tried to escape (several times).
 We've just had a family weekend at Mum's, marking (nearly) one year since Dad's passing with a headstone unveiling and scattering of ashes. It was special to be able to give each of the grandkids a "Pop Monkey". Even though they are all mostly in their 20s I think they really appreciated them and I hope they will treasure their little piece of their 'Pop'.
Off to his new home.
[FYI the tutorials I used for my Sock monkeys can be found here and here. The first one was very detailed but had too many pages to scroll through once I got the hang of what I was doing!]
FOOTNOTE - I meant to give Mum the credit for the great stuffing job she did while she was up over Christmas. Thanks, Mum :-)
~~~~~~~
We also had a sprinkling of Christmas over the weekend as my brother and sister were both here from overseas.
This is a belated present for my sister.
Table topper using hexie-flowers from NZ fabrics.
Something to remind them of home.
(Should have taken a full photo sorry, it's roughly the size of a
 FatQuarter)
Had fun of course with some quilting!
~~~~~~
This week SewCalGal launches 'A Year of Red and White Challenges', which is something I am excited to join up for. Click here to find out more about it.
She starts the series of challenges with a Bloghop to, hopefully, get the inspiration juices flowing. The hop is based around using EQ7 to have fun creating red and white quilt designs. I am sure that even if you don't have Electric Quilt software and are interested in the challenge, you will find them interesting.
Here is the schedule for the Bloghop —
 Monday, January 27th


Tuesday, January 28th

Wednesday, January 29th

Thursday, January 30th

Friday, January 31st
(that's me!)

As always, SewCalGal has got sponsors and prizes for this year's series of challenges - always a good encouragement to take part :-) And a great way to stretch yourself and learn/try something new!
Until then,
Happy Stitching everyone,
Have a great day,

Monday, January 20, 2014

A Scrappy Project

(A post where I use a (small) ufo, sew some scraps AND make a Christmas gift!)
We all know Raewyn likes a challenge, so when SewCalGal announced she had some for us this year I was keen to learn more :-)
[You may remember the Free Motion Quilting challenges she has run the past 2 years, I had a lot of fun with them].
One of her 2014 challenges is the  "Handmade Christmas Challenge" which really appealed to me - oh to be more organised for Christmas time! As I was already hoping for more of a Handmade Christmas this year, I was sold! 

We are asked to make a Christmas gift or Christmas decorating item, to share it, and some tips, hints or even a tutorial to inspire others. 
Easy enough, you may think, but where to start?!!

Blocks from Flirting with Flowers by Vicki Tucek, now called the
Pickledish Patch.
These little blocks were part of a free block of the month project which Vicki Tucek (The Pickledish Patch) offered during 2010. (They are still available, for a small charge, on her site). It was one of my first forays into needleturn applique and I really enjoyed making them. As is often the way, I never quite finished the project and the blocks have sat forgotten, but not unloved, waiting for attention for a while now.
I pulled one block out recently and have given it a new life. I decided it was the perfect size for a book cover.
I have a formula I use when making book covers. Close the book and measure the full size of it; that is, run the tape measure across the front, around the spine and then across the back. Add 9" to this measurement. Then measure the height of the book and add 1" to that.
Then it is a matter of joining your fabric pieces until you get to this size. Approx. 4 1/2" at each end will be inside flaps so I usually keep those unpieced, but for the rest of the cover I play around until the fabrics that I want to use all fit together.
Then I back it with a light iron-on pellon, or similar, and lightly quilt it. The quilting may not be necessary but I like the finish it gives. For this one, I stitched in all the ditches and then free motioned around the applique pieces.
Once I've joined the lining to the front at each end only, I make the flaps by tucking the side seam in. [If you don't know this method, let me know and I will share that, I didn't take a photo at the time and it is easiest to illustrate by a photo]. [Explanantion for lack of detail further on in post].
The ladybird is too cute!
Quite by accident I discovered a good way to do the lining; rather than starting with one large piece the size of my cover, I join two pieces together so there is a seam down the centre. Leave an opening in that join - you can pull the cover through it to turn it right side out...I find it a lot neater than leaving an opening in one of the outside edges.
Finished cover 
Internal shot!
Without too much fuss, we have a book cover!!
I hope you've found these points useful and maybe they will inspire you to pull out a lonely block and turn it into something new.

Apologies for the lack of photos for this tutorial/post. While I was finishing it off yesterday afternoon I was mentally distracted by a bushfire raging across the road. Devastating and heartbreaking. Some of our beautiful bush across the road has gone, as well as some Reserve Land and the neighbour's bush and pines. Apparently the gulleys of big trees are still intact but the ridges are burnt out. There were some huge flames. Helicopters were working into the night and are back there this morning. I'm not looking forward to having to face facts and actually see the damage myself.
No-one was hurt, no stock were harmed, no buildings or vehicles were 'in the way' and rain is forecast so I guess we have plenty to feel thankful for.

To see more Christmas sewing projects click *here*
To go to Scrap Basket Sunday, hosted by Kim's Big Quilting Adventures, click *here*
Thank you to both lovely ladies for inspiring and motivating us yet again :-)
Happy stitching everyone,
Have a great day,

Wednesday, January 15, 2014

We have a Finish!

A couple of posts ago I commented that I had finished a quilt... but I didn't have any photos to share. Today I managed to grab a few moments to photograph it.
So very exciting to have my first finish of the year, I hope it is a sign that I am getting the year off to a good start!!
Anyway, here it is.
The quilt is called Birdy Love and is one I did for my favourite quiltshop. We ran it as a BOM and it was a Quilt As You Go project. It focussed on practising free motion quilting. Each month participants received the fabrics/pattern for completing/quilting one block. I kept the applique/piecing fairly straight forward so we could quickly get to the quilting. It was a challenge every month to come up with a different technique or design, but I did enjoy it and learnt heaps as well.
Those who kept up will have a completed quilt pretty much as soon as they finish the last block!
Here are some photos of various elements - some, but not all, I have shared here before.
This picture and the one above it show designs by Lori Kennedy of
Inbox Jaunt. She kindly gave me permission to use her designs.
All finished quilts deserve an Arty Pic!
 Whew, like I say, great to have a finish!!!...... Now onto another project... :-)
Happy stitching everyone,
Have a great day!

Saturday, January 11, 2014

My Friday Night with Friends

I hope everyone else had just as pleasant a Friday night as I did —

First up there was a bit of baking so we wouldn't go hungry come supper time—
Chocolate Bits maketh the Biscuit!
Then a bit of crochet while watching 'The Block'—
Really loving how my Ripple Afghan is coming along
Then down to The Palace for a bit of sewing —
Boring, Raewyn!!
Isn't this the 6th Pyramid Pouch you've made in a month?!
Just as I was heading off to bed I remembered that my ironing board hadn't had it's New Year's present yet —

To see what others got up to on their Friday Night with Friends click here to see the lineup on Cheryll's blog, thanks Cheryll for hosting us all :-)
Happy stitching everyone, have a great day,